Tuesday, August 27, 2013

Busy busy busy busy

Necklace I made using freshwater pearls
and imperial jasper
I haven't done a post in sometime. Life has kept me jumping and otherwise occupied. So, with a moment of down time I can breath and maybe bring the world up to speed on my tasks.

I finished a slit neck tunic, an under tunic featuring a trapunto keyhole neck, extreme progress on a short sleeve purple gown, a new veil to go with the filet, a necklace, a hood, various mundane household soft goods, and a pair of fighter hose for my husband.

Whew!!

I have some garb to fine tune and some that needs a start. I need to fine tune the purple dress which includes a large amount of embroidery and metal work, start some tablet woven belts, begin the black heraldic dress for a friend, a long under dress in saffron yellow for me, and push on working up my husband's soft kit for heavy fighting.

Pant!!!

I plan on featuring the soft kit for my work shop follow along. Plus a look at doing easy braise and a look at hose.

Wool on linen featuring silk tassels

Slit neck tunic for a friend
Egon approving fabric
Sayuri approves of nothing


Tuesday, July 16, 2013

Tablet Weaving Improvised

Chartres statue
Well, with things like the veil, under dress, and filet done it was time to consider the belt. Now, the belt of a bliaut is not a simple little strip of leather. It's a rather long bit that wraps around you twice, ties in the front, and dangles happily down the front of the dress. I do have one carving where the dangling bit is missing, but generally speaking, they dangle.

This lovely long belt, also called a cincture, is often times depicted modernly as a piece of very long trim or a fabric belt with the addition of cords and tassels. There is nothing wrong with either approach. I however, staring for many hours at pictures of statues and manuscript art, have come to embrace the notion of a long tablet woven band with the excess decorated for the purposes of resembling those statues. The width of the cording and the way that the edge of the belt fabric eases into the tasseling ends just seems too much tablet weaving and how the excess can behave. It can easily braid and twist into it's own cording.

So... Yeah.

Seems like the best idea to me.

So, like my filet, I would have to do the best with what I have on hand. In this case, I made my own cards from cardboard inserts from a pet food box. I used a wooden ruler as the beater. Using part of a thread tube I fashioned a shuttle. Plus, I flipped a Windsor chair over to use as my loom. I paid $6.00 for a rather silk like yarn to make the magic happen.

I chose a simple pattern, cut, and loaded the cards. Got them in order, I pulled out a sufficient amount of yarn for the first tail. I had to get creative for the wrapping the other side. But the loom idea worked like a dream and after a few hours a day here and there I soon had enough to call the belt body done.

If you are looking for a wonderful little how to, look here.
Next installment we will look at the decorating of the hanging bits. I am still finishing that part up.
Threading the cards.  Wouldn't have been too bad, but the cats kept attacking.
Working the pattern, using a ruler to pack the yarn.
Close up of the forming pattern.
Wrapped around a chair due to lack of loom.
And... the final completed length.

Saturday, July 6, 2013

Final Bag 1

Today's goal of finishing the bag was met.

After I applied the interfacing to protect the stitches, I sewed up the sides on both the potter bag and the white linen liner. Three original has a lovely bit of hold tablet weaving over the seams. I opted to use more gold couching because I currently lack tablet weaving supply. After which I added a little tassel, a detail more popular on 12th century bags.
Upon lining the bag, I left a small opening so I could turn it properly. I had originally planned to leave that opening in the liner, but forgot about it till I put it on the machine.


Oh well...

Anyway, I crocheted up some silk cords that I had to fight my kitten for control of.  I managed to drum up some nice silver metal beads from work to tie on to the ends. Attaching the ties was the hardest thing to do with Egon constantly trying to eat them.

But it is all done now. My husband wants a bag of his own now.  Who saw that coming?

Me.

Thursday, July 4, 2013

Progress on Bag 1

So, the bag I had been working on is coming along nicely. I just put the finishing bead and pearl work on. I added a bit of fusible interfacing to the bag to protect the beads. Even though it's going to be lined, I don't want a bead or pearl to get snagged, break the thread and cause an expensive mess.
Glass pearls are fine. But I love the texture and glow of real fresh water pearls. Even the C grade pearls have loads of wonderful personality. I also used cobalt glass beads. I have a large stash I've been sitting on for about 20 years. They just glow blue in the light. Beautiful little things that must be used.

The bag I based this one on is a Byzantine relic pouch from the 10th or 11th century. I know, a bit early for me, but it made through the 12th century and never lost its fashionable charm. It has been described thusly: “lattice-work wreath pattern worked on a [silk] ruby red ground. It is made from a single linen-lined piece of cloth, and has seams on two sides. These are concealed by a narrow gold tablet woven border. The red silk drawstrings and carrying-cords are adorned with 25 silver balls.”
Now, I know someone out there is screaming about how I added pearls when there are no pearls on the extant piece.

My Reasoning Process
1) It's modeled after a Byzantine piece. Tons and tons of pearls were used by their royalty. It was if they had a pearl cannon and just drenched everything in pearls. If the former owner was modest or not noble, it stands a good chance it would not have gotten the pearl treatment.
2) I portray a 12th century French noble. Damn straight I am going to add pearls.
Once the bag is done, I will show it off. I still have to select beads and cords and line it. It will be all kinds of fab!!

Sunday, June 30, 2013

The Filet

German ladies
So, here I am on a warm summer morning having just swept the floor and rescued our cat that had ran away two days ago, looking at the linen for a veil that I just washed, dried, and ironed. Rather than get cutting on the oval, I find inspiration and instead decided to work up a filet.

The hook:
only using what I have on hand.
 
Sorting through scraps of linen, I decide to go with a heavy white. I rather have a color, but I figure I need multiple hats like any good lady and here I can test my skills on the basic. I may or may not bling it up later.
 
If you are following along to make your own:
  • Iron should be on hottest setting, no steam.
  • Trim interfacing to meet fabric, not other way around.
  • Use 1/4 inch seams.
  • Take the extra bits of advice I give.
I need a 22 inch circumference, so I add 1 inch. I cut a 3 1/2 inch width.


Cut two from heavy fusible interfacing designed for handbags. Thinking I may need something for the core, but will figure that out in a moment.


Attaching the interfacing and letting the pieces cool, they are stiff enough to stand on their own, but I want a bit more durability. I know some girls use leather, others plastic canvas. My problem, I don't have that.  But I do have light canvas and more interfacing!! I figure I could make a sandwich using the two with under canvas add the filling. Cutting canvas at a 3 inch width, I give it a 22 inch circumference with the interfacing at the same. Iron together.


Now, trimming up the outer pieces, I match them up with right sides together and sew along top.  I take a moment to open them and press with wrong sides together. This is a tremendously helpful step when you go to turn. Do not skip it. With wrong sides together, stitch bottom.


Turn. (I took a pic of the turning, but it looked like a fabric penis, so no pic.)  Press flat and lovely.


Take center insert and trim if needed to be slightly smaller than filet. Insert and pull through, use a pair of tongs to assist if needed at half way point.


Insert one end into other and find correct size. Next fold raw edges under.


Stitch closed.


Ta da!!

Friday, June 28, 2013

A Happy Find

I wasn't planning on posting my bliaut work tonight. I really wasn't planning on posting anything.

Here's what went down:

I am planning a few more garments for the husband and myself. On Facebook Bella has this group where she shares her own ideas based on observations. One of the ideas that had me intrigued was the skirt being cut separately, pleated, and attached by a decorative band. I began my own research and found it referred to as a bliaut gironé, a style confirmed by Scandinavian archeologists. See: Medieval Clothing and Textiles 8 byRobin Netherton, Gale R. Owen-Crocker. A book I plan on trying to procure and not just stuck with limited access to for Web previews.

Alors!  Information sleuthing is my strong point.

Well, I thought I would see about finding some images when I found one I hadn't seen before. I got down right giddy. I found an image of an extant garment. The tunic of Don Garcia from the 11th century, from a site in Spain, made of silk. I could see how high the lacing went up, where the gores were, and how exact the keyhole neck was. Though it is earlier than what I am doing, it is still significant for the purpose of construction. It looks so much like the illuminations and stone carvings I almost became down right enthusiastic.

I don't recall ever seeing it before. And I was very glad to have found it. I am sure others have. But for the moment, the find was mine.

 tunic of Don Garcia

Thursday, June 27, 2013

Tramping About with Trapunto: part 2

Madonna of Viklau, Church of Viklau, Sweden
Now we actually get to the body of work. I have been making under tunics for some time. Usually they end up looking like a very pared down version of an over tunic in white or other muted easy to clean color with a simple neck. I use gussets under the arms and occasionally I will add side, front, and back gores as needed by the skirt to get desired fullness. This time around I decided on just side gores and a key hole neck, even though most evidence have a much higher neck line similar to a gambison.

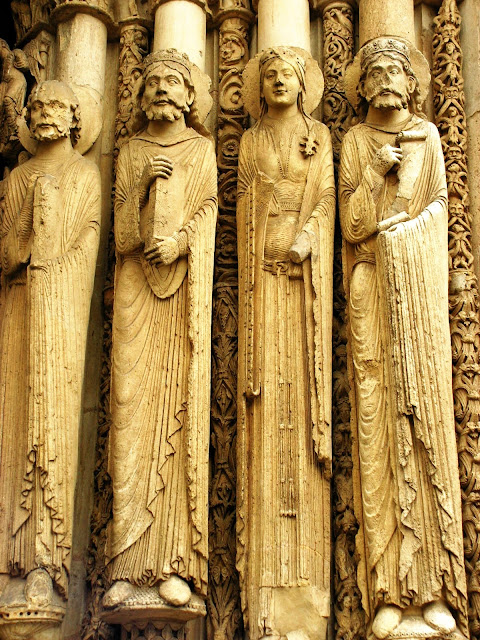
I have to tell you, for about five minutes I considered the possibility of the ladies at Chatres wearing gambisons under their bliauts. Warriors for God kind of a thing. Then I said it out loud. Yeah, it didn't sound right. I thought about it one more time, amused. I had mental images of the stone women hopping to life waving swords screaming "cuillier!"

How many of you are actually going to grab a dictionary to translate? (if I spelled it correctly that is.)

Alors!

The nitty gritty of making the trapunto neck and cuffs. Well, would be awesome if I could show you, but I didn't take step by steps. When I started to work on this gown, it was only with the intention of showing off the final results on Facebook. My workshop and lab was not a thought in my head at the time. I do have plans for a second more ornate, more sculptured work that I will do step by step on. Until then, you will have to endure the rambling. I cut a keyhole neck piece larger than normal, pinned to the neckline, and sewed it on so that the raw edges would be sealed between the right side of garment and wrong side of facing. Ironed to set the facing on the outside, and pinned down to prevent it from shifting while sewing channels.

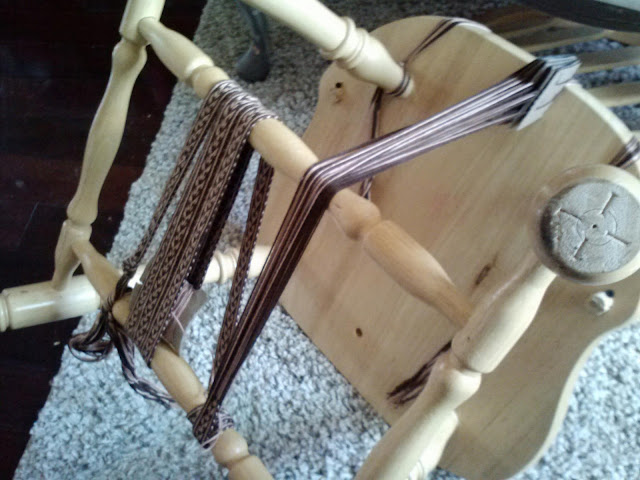
Needle and thread in hand, I eyed a 1/4 inch channel around the neck hole and used a running stitch just like one would use in every day quilting. After making a channel of two, I would thread a yarn needle with a double stand of white cotton yarn to pull through the channel. Being an avid crochet enthusiast, I always have it on hand. Piercing the wrong side, I simply fed it through. A friend of mine thought herself impatient because she would stuff the channel right after she made it. Well, in researching period trapunto I found that the artist would fill the work as they went. So I can happily say that impatience is period.

On the final row I trimmed the edge down to about a little mire than 1/2 inch from the previous row of stitches. Folding the raw edge under, and clipping into the corners slightly, it was pinned and stitched down.

Repeated the process for the sleeves.

There was some conversation about how many rows should be done. What it boiled down to was counting the number of visible rows on the statue and I added one because of a small hint of a possible final row. As for the sleeves, I had seen images that showed three all the way to the elbow. I felt about five inches worth would be fine. And it was.

After all the hand work was complete with seam finishing and taking up the hem, I tried it on.  I was a little concerned that the quilting would make the neck and wrists warm, but it wasn't too bad at all.

So, to my 12th century friends, I give trapunto gowns a big thumbs up.

Wednesday, June 26, 2013

Tramping About with Trapunto

The Tristan Quilt on display at
the Victoria & Albert Museum
Recently I had an interesting concept introduced to me by a friend. The technique of trapunto being used to create a decorative relief in the collar and cuffs of under tunics in both men and women's garments. While there are no physical garments to confirm this, there is plenty of art to compound the possibility.
 
Trapunto was used primary in bed linens and armor, layering and stuffing channels for gambisons. The first three images are just of that, Italian.
 
Look at cuffs and necklines of the Chartes cathedrial figures presented.
Now, if a seamstress were willing to apply the craft to armor, bedding, and accessories, then why not to the clothing as well?  Sculptors and illustrators seemed to think it a good idea, and not just in one region.  Though, the bulk of them seemed to be in France. 
 
Looking at the cuffs, I began to doubt that they were gathered as they all have the effect only on one side. 
There was another image of a man in bed and he had a similar effect, but also with buttons.


I was able to find a bag that was done using the technique. A rather elaborate piece.

Off We Go

Byzantine pouch in silk, Beromunster, Switzerland
The inaugural entry to this blog shall be one that accomplishes a few things. Explanation, clarification, and a look into current projects.  I decided to do this blog because, frankly, I don't like to clutter up face book or the groups I am on with long winded postings about what I am making, why I am doing it a certain way, and an over posting of rambling thoughts. If my fellow 12th century clothing nuts wish to venture into this hemisphere of my brain, then all I can suggest is to tie a piece of string to the start of the labyrinth because I do ramble. But in a good way. Promise.
Now, it should be noted that this blog is not done by a professional costumer or historian. I am a crafter with a background in law and public services. I love reenacting and recreating. I find joy in learning and researching. However I am unable to commit hours upon hours or the money to directly research primary resources. I do have to rely on the internet and library trips to find images. So if an image looks familiar, it probably is. If it's uncredited, I don't have a proper one but would happy to fix that if given it. This is also my work to educate myself and others on the same path.
As educational work, constructive criticism is welcome. As are fresh ideas and notes on perspective.

Down right the nose comments are not.

My blog. My rule.

I would also like to thank two people here at the start. My lovely Bella, for unknowingly helping to rekindle my passion for the 12th. To my loving Husband, for always encouraging me to push that little bit further.


Surface couching with gold thread on linen
Now, on to current projects. I have two that I have been working on here in the old project room. A bag and an under dress using trapunto to decorate the neck and sleeves. I have been looking a little bit more deeply into the trapunto items recently, so I will save that one for later. But, the bag is actually one of those things I have attempted to model a little closer to the image I saw.
I am using linen, couched with gold thread. Gold thread is... difficult... to work with, but hopefully the results will be worth it. I am using a blue cotton for some filler embroidery. I plan on adding pearls.

A 12th century girl can never have too many pearls.
 

The addition of blue accents,