Tuesday, January 20, 2015

Skirting the Issue

Hortus Deliciarum
I have been living my life for the last few months surrounded by creative process and research. Spinning yarn, dying, embroidery, crocheting, sewing, writing papers, and teaching classes have all been occupying my time and life.  A large portion dedicated to researching and planning projects at various stages.  Which is okay.  I do love research and I enjoy sharing what I discover and sometimes it helps to form my opinions and a fresh perspective never hurts.

More recently I was working on a bliaut class.  Presenting general information and ideas to further define the concept of what it was.  A class that will find it's way here soon.  As I was delving into skirts, arguing against front gores, and expanding the view to include the bliaut gironĂ©, I began to more stiffly consider those side gores.  Traditionally I, along with many other seamstress, would cut our triangles, attach them to body panels, zip up the sides and call it fin.  While examining the flat panel fronts, I began to wonder about the rather full sides.  They seemed to me that in some works of art they were bearing a lot more fabric that simple gore would usually add.  Perhaps the gores had been pleated to add a fullness to the skirts.  I began to investigate these skirts further.

Well, upon digging around, I found the topic had already been researched a bit by one of my friends and I took a look at the different images of research that were offered up that were different than my own.  I began to feel two different ways about:

1. Upset.  I was hoping to offer up a new perspective on something that I was feeling really excited about.  When you have many people investigating something, someone else is more than likely going to notice it before you, but you try anyway.  The thrill of the new is an enticing thing and it is always a cold moment when someone else beats you to it.

2.  Proud.  I noticed something that my friend, a 12th century maven might I add, noticed and did not have to tell me about it.  I discovered it all on my own.  I didn't have to ride on anyone's back and point in the general direction while shouting "Take me there!"  It is rather nice to have my research skills confirmed.


"Foolish Virgins"
So, on to the bulk of the discovery.  It was the above image that made me think, originally brought up in a group regarding the gentleman's dags.  I found myself looking at the skirt, the relatively smooth front and the multitude of pleats of the side.  Very exciting to me.  I began to work through the small collection of images I had on Pinterest, cell phone, and laptop. 

The next one quite simply is the most popular image of the Foolish Virgins, Italian.  Looking off our whimsical lady's hip, the tiny lines of folds appear quite a bit, indicating more pleating on the side in the gore area.

Next illustration is from the Carmina Burana.  The long graceful lines of pleating can be seen running from waist to hem in the green dress.

Finding illustrations from various areas was good, but when I began to look around at the various groups I belonged to, two images I found delighted me.  A relief sculpture and an extant garment.  Both items only sealed this notion I had regarding the gore treatment in these skirts.  The best is the 12th century alb shown below.  The stitches used to make the smocking have quite the decorative effect.

I still have no idea why I was completely oblivious to these pleated gores up until now, but as I plan my bliaut, I am certain this effect will be quite stunning.  I hope to begin it sometime this spring as we approach event season.  A little something to wow to boys and girls.


Relief from a cathedral in Modena

Monday, September 1, 2014

I Hate Gold Thread

Fecamp Palster
I know it's an odd title for a post "I hate gold thread," however working on this new project and what it commands has really just confirmed how much I hate working with gold thread.  It unravels, frays, knots, breaks, strips off the core, and is a general pain in the butt.  I force myself to work with lengths between eight to ten inches to minimize issues, but with such short lengths it only ever feels like I am constantly cutting more to work with than I am actually working with.  I honestly can't stand the stuff.

But why is this important to my research?

It's not.  I just needed to share my irritation.

So what am I working on here?

Funny you should ask!  Let me tell you after spending much time researching the volume sleeve from my last post, I really found myself 
You remember this one, right?
drawn to Philosophia's dress. I began to check out other similar style sheath dresses.  Which is rather daring when you aren't a size 10 or even a size 16.  Mundane sheath dresses and myself get along about as well as me and gold thread.  But I really like the dress and so, I am taking a plunge here.


I floated through some images and noticed that sheath dresses were usually a patterned fabric, presumably silk, with large sleeves. Sometimes those sleeves were a trumpet or pendant style.  While long, by modern sense, the dress only comes down to about a little lower to mid shin on average with the under dress pooling at the feet.  Of course, I am not going to stop there, I also wanted to look at the available fabrics.  While checking on the brocade patterns found in extant examples, all woven examples were of silk. Other examples of finds made of linen were block printed.  I considered the
print theory, knowing that either one would be acceptable, but in thinking how noble and honored these ideals and ladies were, linen wouldn't be enough.  They would have to be rich and nearly decedent.  Decedent like silk.

By the way, I am of the school there is no such thing as too many pearls.  And the only natural pairing for silk is pearls.  God, I love the 12th century.


German painted linen
Now, let me say this clearly, I love playing in the SCA and I love the freedom it grants me to try out ideas and attempt to create something unique and at the same time historically based.  Because of this I do not admonish those whom like their creations to exactly emulate illuminations, statues, or extant finds.  I rather admire their attention to detail.  However, I am going for the reaction of "That looks like it belongs."  So, when I piece it together, you will see my personal artistic expression in a historically drenched goodie.
Spanish silk brocade

If you don't like it... well, you wouldn't still be reading would you?

You can see much more substance in the brocade than the linen.  Painted linen is awesome, but in the images considered, the silk is more likely for the depth of the aesthetic qualities that the artists seem to be rendering in the palsters and illuminations.

Now, not too stray too far from the given designs, in Philosophia's dress, the trim around the hem is going to be the inspiration for the strip of silk that will be running down the front.  I have yet to decide on pendant or trumpet sleeves.  That has yet to be decided and I have plenty of time for that.

Now, if you'll excuse me, I have more gold thread to go and hate.

Wednesday, July 16, 2014

Query of the Sleeve

Stuttgart WLB, cod. fol. library. 56, <
origin: Abbey of Zwiefalten, 1125-1130
It is fair to say that I love my academic pursuits.  I love working on papers like when I was in college.  A current project of mine is a full paper on the bliaut, including underpinnings and accessories.  While investigating for the paper, I cruised through a French site of a 12th century reenactor and an idea she proposed for an under dress caught my eye.  Though I didn't entirely agree with the execution, the idea was enough to propel me into doing my own research.

Originally when I was viewing these and similar images, I wasn't really paying a whole lot of attention to the under dresses.  I was looking at the construction and embellishment of the over dresses and the adornments.  But now that the images have caught my eye, looking carefully it would seem that sleeve of the under dresses are tight up around the wrist and the billow out and follow the curve of the overlaying pendant sleeves.  They are rather full and often ripple around the edges of the over dress.  Occasionally they appear to be open, with the bell laying flush against the over dress sleeve pendant and other times they appear to be closed with one long front center seam.  The cuffs often have the trapunto look I adore.


12th Century German palster of Philosphia
Not all full sleeves that ripple over the outer dress appear to be this billow type of under dress and could very well be just a full lining.  However, there is one image that I do find interesting and does depict that billow under sleeve rather sharply.  I did try to chase down the original source having found it in groups, Pintrest, blogs, and even a Spanish language site devoted to 12th century philosophy and it's effect on the Christian church, but I didn't find a whole lot.  I am sure some day I will learn more on it.  However, the sleeve is the thing.  You can see it flows from the wrist on down showing that it is not a sleeve lining, but a part of the underdress itself.  Even the skirt flowing out from under the much more narrow over dress contains more volume and fabric, indicating something rather luxurious lays beneath.

It is worth researching further to determine if it was something done.  While most examples seem to be German, I don't recall seeing any immediately French examples.  But then again, this is a notion I only began to play with this morning and so I have only begun to scratch at it, though the same images keep on popping up again and again on my internet searches as I try to make it past the groups and sites where my curiosity begins. 

More digging is needed!!


Saturday, January 25, 2014

Rocking the Box


Today was one of those days where if it wasn't creative in some way, it wasn't happening.  I put together the bulk of a new dress I am working on for an event coming up.  Then I turned my attention to a box I purchased back in late November.  I had purchased it with the intention of painting it for my needlepoint sundries.

I had been lacking proper inspiration of a 12th century style to begin, much less complete, this box.  But today I finally painted the top. Not too shabby. Eventually I will gold leaf around the characters.

But, I need to work out what I will do with the rest.


If anyone is curious about the depictions, since these things most always tell a story, this is the wooing of Ali by Turstin.  Turstin's shield bears the mark of the Company of the Mountain.  So he comes from the cold lands of the north, thick with ice and snow.  It is why he dresses so warmly.  He has come to Ali's home, where there are always flowers.  But she finds his gift of a single gilly flower sweet and is willing to accept it from him.


Tuesday, January 21, 2014

Trapunto, Take Two

Gospel of Henry the Lion
It's been a rough kind of work day.  The kind of day where once I am home, I need to forget about the real world and indulge my habits of sewing, research, and helping others along that path.
 
Yes. I intend to add more educational things and not just show off what I have been working on.  I still intend to do that too.  After several years of researching and watching what others were doing I feel more confident now sharing what I do.  We all get there in our own time.
 
Alors, onto the project of the week, or rather a few weeks ago.

If you remember this project, I have a variation of the kind.  This is a linen under dress with a trapunto neck and embroidered cuffs.  The sleeves were made extra long to give them a gathered effect at the wrists.  Historically the under dress, or shifts, or chemise was linen and white color.  We know from various bits of illuminations, such as above, and references in literature.  Marie de France is one example of a 12th century author whose vivid descriptions of linen depicted it as "snowy" or "white as a meadow flower."  I am going the color route, just to keep things interesting for me.

I based the whole of the dress on a piece of statuary from the Chartes.  You can see the curve of the neck, a single button at the top,
 and then the structure of the cuff, more of a decorated band.


Monday, January 20, 2014

There's Some Changes Going on Here!

Unknown Artist. The Most Holy Mother of God.
Duomo di CefalĂ¹, Sicily mid-12th century
Well, some of you regular visitors to the blog may notice a more fluid and organized format change.  Up until now I was doing all my blog by an app on my cell phone.  I was without a working laptop, but my darling husband has told me to use his until my own technological impairment is fixed.

So tonight I went through and fixed the layouts, removing some images just for the flow, and reworking some of the text.  I am quite pleased with the outcome and plan on making the most of this lovely tool in loan to me by my beloved.

I have a new dress that I am working on that I plan on sharing along with the image that provided the most inspiration.  And the other under garment stuff will be showing up soon.  I still have to conquer that and rewrite my research regarding undergarments since it has been lost to the data demon of the great laptop crash of 2013.

Tuesday, August 27, 2013

Busy busy busy busy

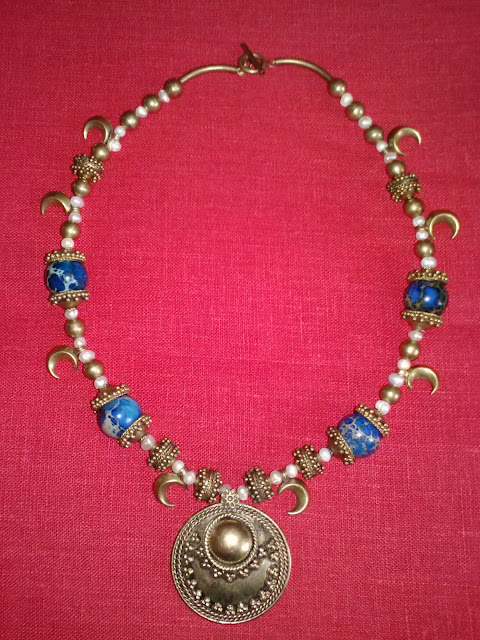
Necklace I made using freshwater pearls
and imperial jasper
I haven't done a post in sometime. Life has kept me jumping and otherwise occupied. So, with a moment of down time I can breath and maybe bring the world up to speed on my tasks.

I finished a slit neck tunic, an under tunic featuring a trapunto keyhole neck, extreme progress on a short sleeve purple gown, a new veil to go with the filet, a necklace, a hood, various mundane household soft goods, and a pair of fighter hose for my husband.

Whew!!

I have some garb to fine tune and some that needs a start. I need to fine tune the purple dress which includes a large amount of embroidery and metal work, start some tablet woven belts, begin the black heraldic dress for a friend, a long under dress in saffron yellow for me, and push on working up my husband's soft kit for heavy fighting.

Pant!!!

I plan on featuring the soft kit for my work shop follow along. Plus a look at doing easy braise and a look at hose.

Wool on linen featuring silk tassels

Slit neck tunic for a friend
Egon approving fabric
Sayuri approves of nothing


Tuesday, July 16, 2013

Tablet Weaving Improvised

Chartres statue
Well, with things like the veil, under dress, and filet done it was time to consider the belt. Now, the belt of a bliaut is not a simple little strip of leather. It's a rather long bit that wraps around you twice, ties in the front, and dangles happily down the front of the dress. I do have one carving where the dangling bit is missing, but generally speaking, they dangle.

This lovely long belt, also called a cincture, is often times depicted modernly as a piece of very long trim or a fabric belt with the addition of cords and tassels. There is nothing wrong with either approach. I however, staring for many hours at pictures of statues and manuscript art, have come to embrace the notion of a long tablet woven band with the excess decorated for the purposes of resembling those statues. The width of the cording and the way that the edge of the belt fabric eases into the tasseling ends just seems too much tablet weaving and how the excess can behave. It can easily braid and twist into it's own cording.

So... Yeah.

Seems like the best idea to me.

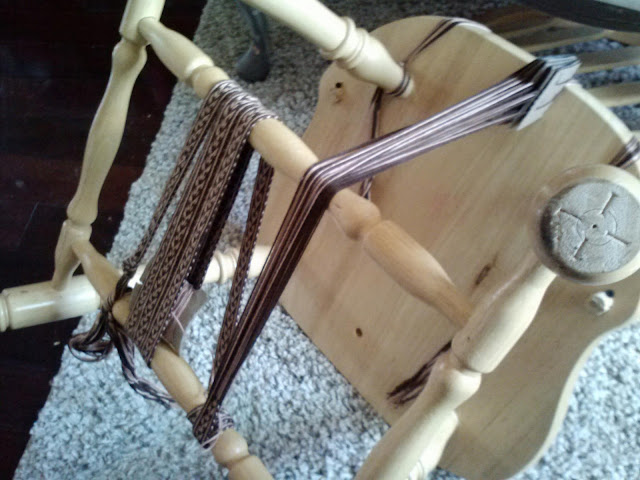
So, like my filet, I would have to do the best with what I have on hand. In this case, I made my own cards from cardboard inserts from a pet food box. I used a wooden ruler as the beater. Using part of a thread tube I fashioned a shuttle. Plus, I flipped a Windsor chair over to use as my loom. I paid $6.00 for a rather silk like yarn to make the magic happen.

I chose a simple pattern, cut, and loaded the cards. Got them in order, I pulled out a sufficient amount of yarn for the first tail. I had to get creative for the wrapping the other side. But the loom idea worked like a dream and after a few hours a day here and there I soon had enough to call the belt body done.

If you are looking for a wonderful little how to, look here.
Next installment we will look at the decorating of the hanging bits. I am still finishing that part up.
Threading the cards.  Wouldn't have been too bad, but the cats kept attacking.
Working the pattern, using a ruler to pack the yarn.
Close up of the forming pattern.
Wrapped around a chair due to lack of loom.
And... the final completed length.

Saturday, July 6, 2013

Final Bag 1

Today's goal of finishing the bag was met.

After I applied the interfacing to protect the stitches, I sewed up the sides on both the potter bag and the white linen liner. Three original has a lovely bit of hold tablet weaving over the seams. I opted to use more gold couching because I currently lack tablet weaving supply. After which I added a little tassel, a detail more popular on 12th century bags.
Upon lining the bag, I left a small opening so I could turn it properly. I had originally planned to leave that opening in the liner, but forgot about it till I put it on the machine.


Oh well...

Anyway, I crocheted up some silk cords that I had to fight my kitten for control of.  I managed to drum up some nice silver metal beads from work to tie on to the ends. Attaching the ties was the hardest thing to do with Egon constantly trying to eat them.

But it is all done now. My husband wants a bag of his own now.  Who saw that coming?

Me.

Thursday, July 4, 2013

Progress on Bag 1

So, the bag I had been working on is coming along nicely. I just put the finishing bead and pearl work on. I added a bit of fusible interfacing to the bag to protect the beads. Even though it's going to be lined, I don't want a bead or pearl to get snagged, break the thread and cause an expensive mess.
Glass pearls are fine. But I love the texture and glow of real fresh water pearls. Even the C grade pearls have loads of wonderful personality. I also used cobalt glass beads. I have a large stash I've been sitting on for about 20 years. They just glow blue in the light. Beautiful little things that must be used.

The bag I based this one on is a Byzantine relic pouch from the 10th or 11th century. I know, a bit early for me, but it made through the 12th century and never lost its fashionable charm. It has been described thusly: “lattice-work wreath pattern worked on a [silk] ruby red ground. It is made from a single linen-lined piece of cloth, and has seams on two sides. These are concealed by a narrow gold tablet woven border. The red silk drawstrings and carrying-cords are adorned with 25 silver balls.”
Now, I know someone out there is screaming about how I added pearls when there are no pearls on the extant piece.

My Reasoning Process
1) It's modeled after a Byzantine piece. Tons and tons of pearls were used by their royalty. It was if they had a pearl cannon and just drenched everything in pearls. If the former owner was modest or not noble, it stands a good chance it would not have gotten the pearl treatment.
2) I portray a 12th century French noble. Damn straight I am going to add pearls.
Once the bag is done, I will show it off. I still have to select beads and cords and line it. It will be all kinds of fab!!

Sunday, June 30, 2013

The Filet

German ladies
So, here I am on a warm summer morning having just swept the floor and rescued our cat that had ran away two days ago, looking at the linen for a veil that I just washed, dried, and ironed. Rather than get cutting on the oval, I find inspiration and instead decided to work up a filet.

The hook:
only using what I have on hand.
 
Sorting through scraps of linen, I decide to go with a heavy white. I rather have a color, but I figure I need multiple hats like any good lady and here I can test my skills on the basic. I may or may not bling it up later.
 
If you are following along to make your own:
  • Iron should be on hottest setting, no steam.
  • Trim interfacing to meet fabric, not other way around.
  • Use 1/4 inch seams.
  • Take the extra bits of advice I give.
I need a 22 inch circumference, so I add 1 inch. I cut a 3 1/2 inch width.


Cut two from heavy fusible interfacing designed for handbags. Thinking I may need something for the core, but will figure that out in a moment.


Attaching the interfacing and letting the pieces cool, they are stiff enough to stand on their own, but I want a bit more durability. I know some girls use leather, others plastic canvas. My problem, I don't have that.  But I do have light canvas and more interfacing!! I figure I could make a sandwich using the two with under canvas add the filling. Cutting canvas at a 3 inch width, I give it a 22 inch circumference with the interfacing at the same. Iron together.


Now, trimming up the outer pieces, I match them up with right sides together and sew along top.  I take a moment to open them and press with wrong sides together. This is a tremendously helpful step when you go to turn. Do not skip it. With wrong sides together, stitch bottom.


Turn. (I took a pic of the turning, but it looked like a fabric penis, so no pic.)  Press flat and lovely.


Take center insert and trim if needed to be slightly smaller than filet. Insert and pull through, use a pair of tongs to assist if needed at half way point.


Insert one end into other and find correct size. Next fold raw edges under.


Stitch closed.


Ta da!!